Red Velvet Whoopie Pies
Ditch the boring old chocolate and buttercream whoopie pies and make these colorful and decadent Red Velvet Whoopie Pies instead! These moist and chewy handheld pies feature a sweet and tangy cream cheese filling sandwiched between two cakey and chocolatey red velvet cookies.

Red velvet is one of my absolute favorite cake flavors! Something about the combination of delicate chocolate cake with thick and rich cream cheese frosting is so magical! It doesn’t matter if these flavors are featured in a full-sized cake, cupcakes, cookies, or whoopie pies, they’re sure to be a hit! In fact, my red velvet whoopie pies steal the show at every party, potluck, and shower that I bring them to.

These Red Velvet Whoopie Pies ingredients are right in your cupboard
It’s hard to believe that these scrumptious little pies are made from ingredients that you likely already have lying around your kitchen! Cocoa powder, cream cheese, and red food coloring are combined with a few pantry staples to create these cake-like cookie sandwiches. There’s no need to run out to the store to pick up some expensive ingredients that you’ll never touch again. Instead, these red velvet whoopie pies allow classic flavors like chocolate, cream cheese, and vanilla to shine. If you enjoy these cookies, please try our Chocolate Cake Cherry Cookies and Peanut Butter Cookies with M&Ms.
We Love This Recipe Because It’s…
- A colorful take on a rich and chocolatey classic
- A no-mess, handheld dessert perfect for parties
- Moist, chewy, sweet, and fluffy
- A quick 30-minute bake

Ingredients (Cookies):
- 1 cup salted butter
- ¾ cup white granulated sugar
- ¾ cup dark brown sugar
- 2 large eggs
- 1 tsp vanilla extract
- 1 tsp red food coloring
- 2 ½ cups all-purpose flour
- ½ cup cocoa powder
- 1 tsp baking soda
Ingredients (Filling):
- 1 8 oz block of cream cheese
- 2 cups powdered sugar
- 1 tsp vanilla extract
How to Make the Best Red Velvet Whoopie Pies
- Use a stand or hand mixer to cream together the butter, granulated sugar, and brown sugar until light and smooth.
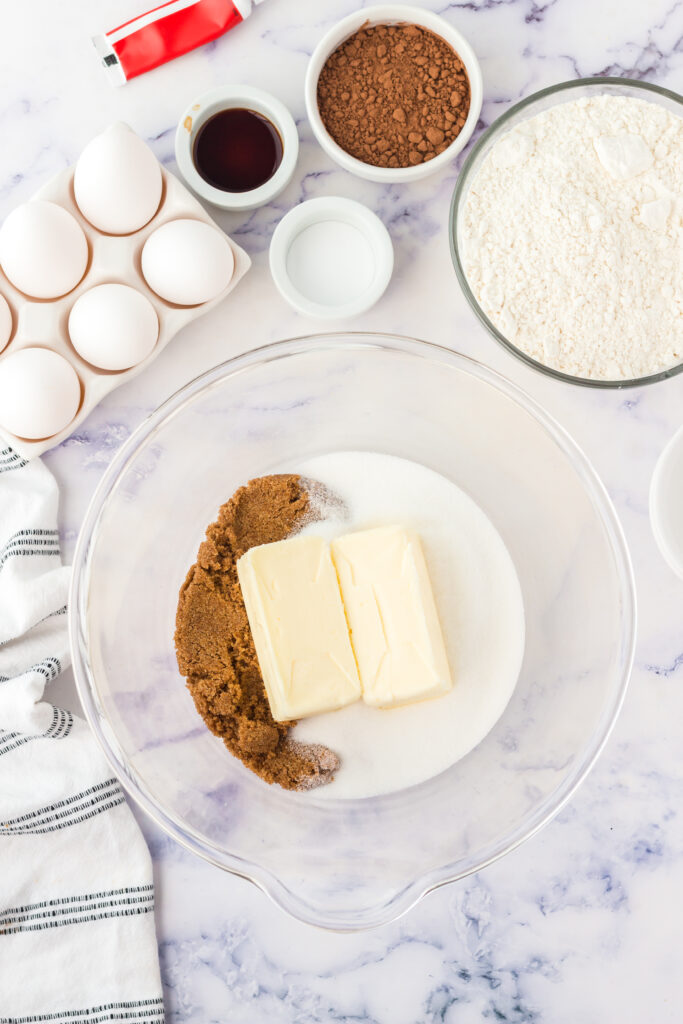
- Add the eggs, vanilla, and food coloring and mix until well combined.

- Fold in the baking soda, flour, and cocoa powder just until no pockets of dry ingredients remain.

- Shape the dough into balls and spread them evenly across the surface of a cookie sheet.

- Bake the red velvet whoopie pies until the edges are set and they’ve lost their raw shine.

- While the pies are baking, beat the cream cheese, powdered sugar, and vanilla extract together until smooth.
- Pipe a generous dollop of cream cheese filling onto the flat side of half of the pies. Add the remaining pies on top to create a red velvet whoopie pie “sandwich”.
- Serve and enjoy!

Frequently Asked Questions about Red Velvet Whoopie Pies
Can you make these red velvet whoopie pies vegan?
Absolutely! Just swap out the butter, eggs, and cream cheese for your favorite plant-based alternatives. You can also just skip the cream cheese filling if you’d prefer.

This depends on who you ask. This hand-held treat is moist and chewy like a cookie, but fluffy and soft like a slice of cake. In my opinion, you get the best of both worlds with these cookie-shaped cakes.
Why are my Red Velvet Whoopie Pies coming out flat?
If your whoopie pies are coming out of the oven super flat, you might be overmixing your batter. Make sure that you gently mix all the ingredients together until they’re just combined. You can also try chilling your dough for 15 minutes prior to baking.

How to Store Easy Red Velvet Whoopie Pies
Any leftover whoopie pies can be stored in an airtight container in the fridge for up to 6 days or in the freezer for up to 6 months. Enjoy these pies cold or at room temperature—no need to reheat anything!
Serving Suggestions
These red velvet whoopie pies are a great treat to serve at parties, showers, and potlucks because you really don’t need any extra garnishes or dishes to enjoy them! You can keep things simple and serve these whoopie pies on cocktail napkins. Or if you’re feeling fancy, try topping them with a dusting of powdered sugar and a few sprigs of fresh mint. Just don’t get too crazy—you want the simple chocolate and cream cheese flavors to be the stars here!

Expert Tips and Tricks
- Not a fan of cream cheese? You can fill these whoopie pies with your favorite buttercream frosting instead!
- Try not to let your red velvet whoopie pies sit out of the fridge for more than an hour at a time. Any longer and the cream cheese filling will get soft and goopy.
- If you don’t mind giving up a bit of that classic red color, you can use a darker cocoa powder to give these whoopie pies a richer, more intense chocolate flavor.

More Recipes:
Red Velvet Whoopie Pies

Ditch the boring old chocolate and buttercream whoopie pies and make these colorful and decadent Red Velvet Whoopie Pies instead! These moist and chewy handheld pies feature a sweet and tangy cream cheese filling sandwiched between two cakey and chocolatey red velvet cookies.
Ingredients
- Ingredients (Cookies):
- 1 cup salted butter
- ¾ cup white granulated sugar
- ¾ cup dark brown sugar
- 2 large eggs
- 1 tsp vanilla extract
- 1 tsp red food coloring
- 2 ½ cups all-purpose flour
- ½ cup cocoa powder
- 1 tsp baking soda
- Ingredients (Filling):
- 1 8 oz block cream cheese
- 2 cups powdered sugar
- 1 tsp vanilla extract
- Ingredient Notes
- All-Purpose Flour—Or your favorite whole wheat or gluten free flour.
- Cocoa Powder—Try to avoid dark or Dutch-process cocoa; you want these pies to have a light chocolate flavor.
- Sugars—A blend of granulated and dark brown sugar.
- Eggs—Add moisture and a nice chew to your finished whoopie pies.
- Butter—Salted or unsalted plus ¼ teaspoon of salt.
- Vanilla—I prefer Mexican or Tahitian vanilla.
- Baking Soda—Allows your pies to spread the perfect amount.
- Red Food Coloring—Gel works best, but liquid or powdered can also be used.
- Cream Cheese Filling—A smooth and rich blend of cream cheese, powdered sugar, and vanilla extract.
Instructions
- Preheat the oven to 375 degrees Fahrenheit.
- In a large mixing bowl, use an electric hand mixer to cream the butter and sugars until homogenous.
- Add the eggs, vanilla, and food coloring. Whisk the ingredients into the creamed butter until they are fully incorporated into the mixture.
- Gently fold in the baking soda, flour, and cocoa powder until no clumps of dry ingredients remain in the cookie dough.
- Drop 2-inch-wide balls of cookie dough on a baking sheet and bake for 11 minutes. Transfer the cookies to a cooling rack and allow them to cool for 20 minutes while you prep the filling.
- In a medium sized bowl, whip the cream cheese until smooth and creamy.
- Add the powdered sugar and vanilla. Beat the mixture until smooth and homogenous.
- Use a piping bag to pipe a ring of cream cheese filling onto the bottom of half the cookies and then top each one with one of the remaining cookies.
- Serve and enjoy!
Notes
- Store these cookies in the fridge for up to 6 days. I like to store them in the fridge to keep the cream cheese filling from getting too soft. They can sit on the counter for up to an hour before they should be placed back in the fridge.
- You can use any kind of cocoa powder for this recipe: Dutch process, sweetened, or unsweetened.
- I find that food coloring gel gives you a richer red color, but liquid food coloring will work as well.
- If you want a deeper red color, you can add more food coloring.
- The cookies themselves are chewy, like a sugar cookie.
Nutrition Information
Yield
12Serving Size
1Amount Per Serving Calories 719Total Fat 29gSaturated Fat 16gTrans Fat 1gUnsaturated Fat 10gCholesterol 98mgSodium 422mgCarbohydrates 106gFiber 4gSugar 58gProtein 10g